So you want to learn how to oil paint!? How does nine steps or building blocks to accomplishing this task sound? Does it make your brushes start dancing in their jar? Do your tubes of paint start squeezing themselves out on the palette? Okay, maybe that is just a bit too much to expect. But you get the idea. Painters have all started from somewhere near the same place….
The painting supply shopping is done and you are feeling slightly nauseous from the decrease in your bank balance. But you are ready with a few good oil paints and a handful of quality canvases. You have a couple of big brushes, a couple of medium brushes, one or three small brushes plus a tiny one for your all-important signature. You have chosen some old clothes or a painting apron and you have scrounged up a painting rag. You have wrestled your portable easel together without running screaming into the night. You know to clean your brushes carefully with soap and water at the end of each painting session. You know that you are painting with your whole body and not your wrist and hand. If you can, you will stand to paint and when possible do it barefoot. You know to use all of the information from all of your senses, not just what your mind thinks your eyes are seeing. You know that “alla prima” is an Italian word for painting wet-on-wet in a first attempt. Now what?
With a flick of my painterly brush and fingers fluttering across the keyboard, let’s get started!
Today, we are going to begin en plein air (in the open air). Choose a canvas that is small to medium is size. Once you get to your painting location, possibly feeling a little like a pack mule with an unsecured load of pointed objects protruding from various bags and sacks, you are ready to decide on your subject. Once you have given the subject and composition of your painting careful consideration, set up your easel. Swearing is allowed if no one is within hearing distance. Now, decide on your painting intention.
Painting intention: What are you loosely holding in mind as you work today? What is your aim? If you could direct the powers of the universe onto your finished canvas, what would the viewer experience?
Now you are ready to paint:
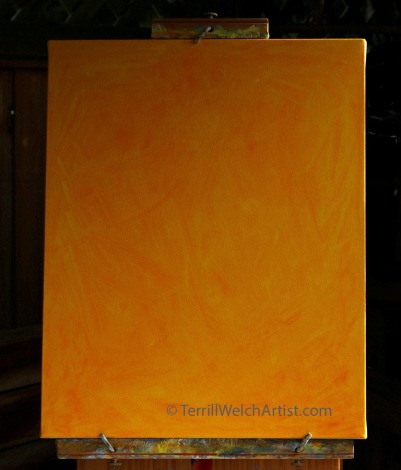
1. Your canvas can have a wet or dry ground colour. In this case, we have a dry ground in cadmium yellow. For our west coast landscape this is often the best ground in order to bring our many blues hues alive on a canvas. But, since this is early spring in a garden, the ground could just as well have been a taupe if it is a wet ground or a thin layer of raw or burnt umber if it is a dry ground. The use of a ground helps to break the barrier between painter and a stark white canvas. You become familiar with the size and shape of the canvas you are using in a very physical way by the time the ground is painted. You have made a start. The ground can sometimes make it easier to see the values or colour relationships as the painting is developing. It is also my preference to have parts of the ground showing through later on rather than the blank canvas.
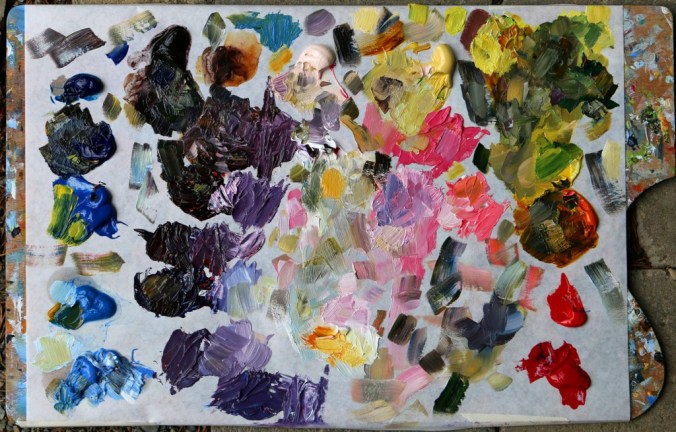
2. Set out your palette. In this case, I am using Lukas Berlin water-mixable oil paints. The pigments are rich, the clean up easy and the paint requires no use of solvents, making it more environmentally friendly than regular oil paints. My other choice, though a little pricey, is M. Graham walnut oil paints. Again, no solvents are necessary in my painting process. However, if you are using paints that require solvents, please make sure you have lots of ventilation. Eventually, each painter develops their own preferred palette layout. The most important aspect of this is that it becomes habitual in some way. You need to be able to easily remember where each pigment is located – without having to stop and think about it every time you want to mix a colour. I am left-handed. The arrangement below works for me. The lightest blue is at the bottom left. The lightest yellow starts in the top right and is arranged below until it gets to the deepest red. The top left is where I will mix my darkest hues, even though I need to reach across to my deepest red to make this happen. I sometime put out a flesh colour when painting landscapes as an alternative to adding white. Naples yellow is used in the same manner.
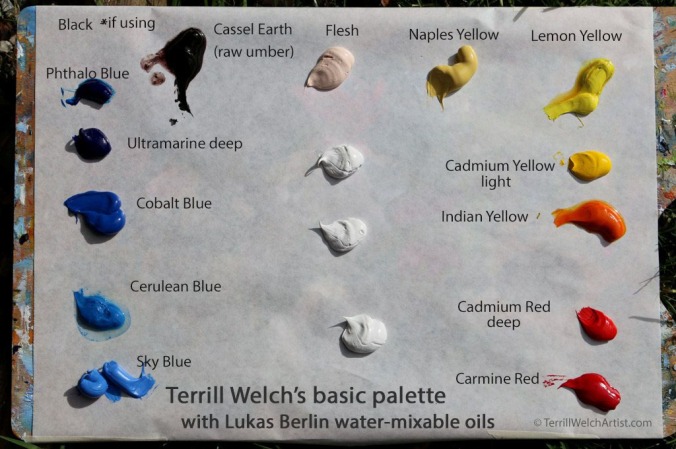
*Tip – Pigments mixed in various mediums and from different brands of paint behave slightly differently and may have different names. Learn how the brand you are using behaves by doing a few colour studies on a scrap of old canvas or panel.
Today, I have no black or payne’s grey on this palette. In fact, I recommend leaving this off until later in the learning curve of oil painting. Notice as well that there is no green or violet. These will be mixed for use as needed. If you haven’t studied a colour wheel recently in order to know what colours can be mixed to make another, don’t worry. For now – put your scientific adventure headband on and experiment. A detailed study of colour theory can come later and will continue for as long as you set about the process of painting. Paints are kind of like being presented with a spice cabinet and a garden full of herbs and then being told to gather together what smells right for the soup you are making. The first few times, you may come up with some rather strange combinations. However, eventually you figure out what you like and what works best for you. You could have just followed a recipe of course. But this leaves you looking up another recipe every time you want to make something new. If you learn by practice, from selectively gathering and using the raw ingredients, eventually you can flavour anything to your satisfaction that you want to cook. You can make adjustments at the start and at any point along the process. Painting is like this. If you experiment, from the very beginning, you have a better chance of developing the skills to allow you maximum creative freedom in the future. Methods, techniques and approaches are all just tools to accomplish the intention that you set out before beginning the painting process.
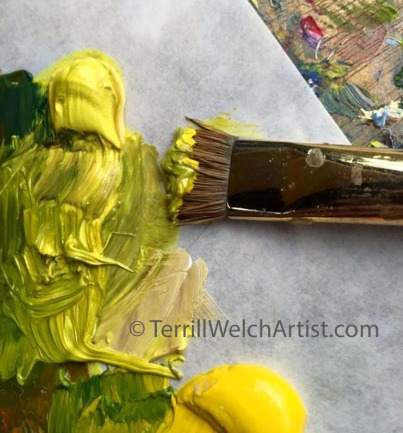
3. Mix a few of the more obvious colours in your composition or those that you want as reference points. In this case, my intention is to catch the very breath of early spring. I want to ensure I have the variety of pinks, violets, plums and purples of the plum blossoms. To have the best chance of getting this painting to sing the flush notes of spring, I mix these to ensure I have strong reference points for later on. At first, try to use your palette knife for mixing what you want to lay onto the canvas. However, I admit to having always used my brush, at least half the time, and continuing the final mix right on the canvas as I lay the wet paint down beside and on top of what is already there.

That long tail on an oil painting brush isn’t there for you to dangle the brush off the end of your fingertips. It is there to help with balance and to keep the tension between brush and canvas as you apply paint on a surface that is at an upright angle. Each paint brush is a little different. You will need to learn the balance point of each one by holding it between your fingers with a light grip that eventually allows you to roll it over-and-around with easy. Practice moving your fingers up and down the handle until you find your perfect balance point. If at any point you start to feel frustrated with how the paint is showing up on your canvas, the first thing to do is recheck that you are holding your brush in balance.
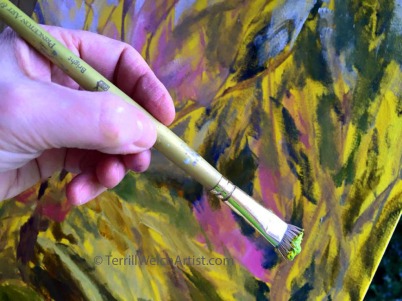
*Tip – your brush is a tool or vehicle to get the paint from your palette and onto your canvas. To most efficiently accomplish this task, load ample paint on just the tip of the brush. But even before you do that dip the brush in oil or water if you are using water-mixable oil paints and squeeze the excess out. This makes the brush easier to clear at the end of the day and helps to release the paint from the brush onto the canvas.
4. Using a large brush or brushes, we are ready to start making a few marks and points of observation and reminders on the canvas. In this painting method, limited-to-no medium is necessary. You do not need to pay too much attention to fat over lean because the paint, for the most part, will all be of the same medium balance. The fat over lean lesson can be learned later on as it becomes necessary. Since you have spent time considering your composition before setting up to paint, don’t over-think this beginning. Just get started. It is only oil paint and canvas. Nothing is right or wrong at this point. You are starting a painting conversation with your subject. Short, brief sentences are perfect. Hello. How are you? What kind of day is it? I like the shape of that darkness stretching up. Look at that patch of pink!? Where is the movement in this composition? Where is the viewer? And so on…. You are beginning to warm up with the most pronounced darks and lights. Your canvas is being introduced to its subject using colour, shapes and the movement of directional brushstrokes.
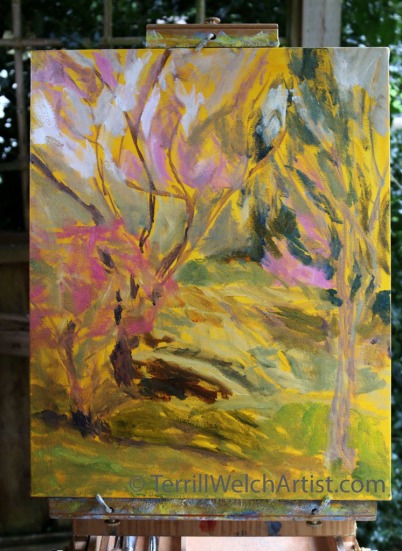
5. While working on your whole canvas, keep going until shapes start to appear. Now check the strength of the composition. Ask yourself – in this composition, who is the star and who are the supporting actors that make them shine? Make any corrections necessary in the various patches of colour. The painting won’t look like much yet but you should be able to see where it is going. The start should have good bones before we proceed. This is often called “blocking in” your composition. It may literally appear as blocks of solid colour. Or it may be more abstract patches of colour as I have here. If you are just beginning to paint, take the time to organize the bones of a composition maybe fifty or even a 100 times without ever proceeding to the tendons, muscles, skin, clothes and some fine jewelry of a finished painting. Research and learn what elements make a good composition. Study and practice composing compositions for a few minutes each day. You can use your smart phone for assistance or you can make a sliding rectangle with by placing your pointer fingers to your thumb on the opposite hand. If you want to get real fancy, you can even buy a small viewfinder and put it in your pocket. The point is that excellent compositions are everywhere. We just need practice in seeing and composing them. The skill of blocking in an initial strong composition, accomplished quickly with large brushes, is essential to the later quality of a painting. It is the support beams and studs of your painting building. This is not the time to be hanging curtains or putting down a throw rug! For now, large brushwork only. To keep the painting from becoming too muddy, you can use one large brush for darks and one for lights. Wipe the paint off the brush between changes in colour. But you don’t need to be too fussy about cleaning it at this point. The purpose is to get some paint on the canvas in the general location that it needs to be placed.
6. Remember to be flexible. Up to this point it has been raining and I am set up in a little overhang. The air is cool enough that my water-mixable oils are a bit stiff. Ideally, I would have used my M. Graham walnut oil paints. But I wanted the easier clean up of the Lukas Berlin paints for the plein air work this morning. Now, the worst thing possible happens. The sun comes out. I have no place to protect my canvas from the direct light and then to still be able to see my subject. I seldom work with an umbrella over my painting easel so I am stuck. I try moving the easel around a few times. I look at the unpredictable sky that threatens to rain again without notice. I make a decision. I am best off to pack up and head to the studio to complete the work.
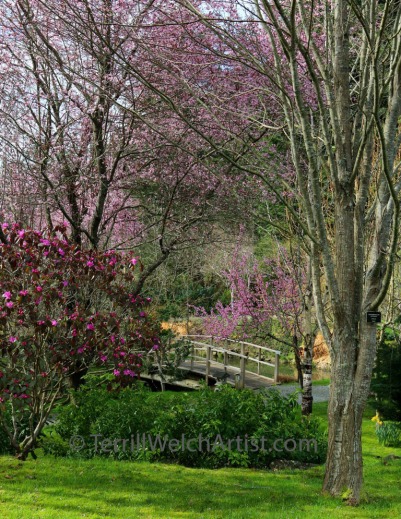
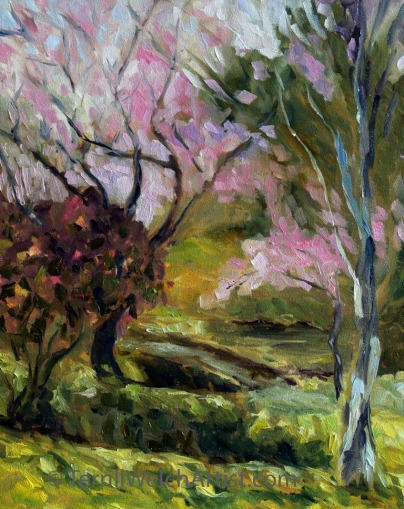
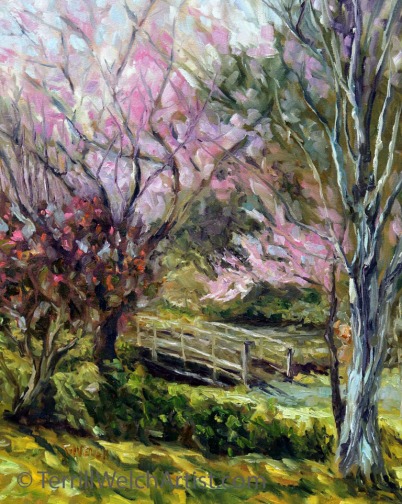
I had taken a few reference images before I started painting when I was still deciding on my composition. The light in my finished painting is hiding some place between here…
and here….
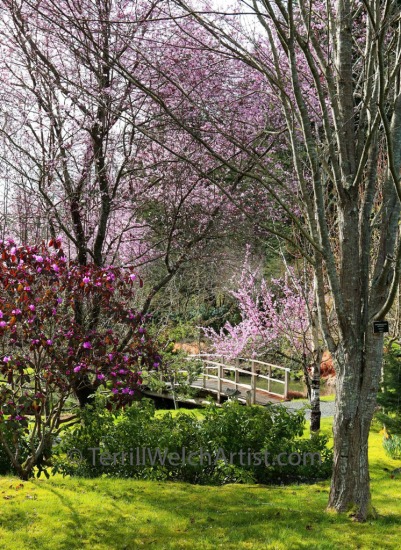
*Tip – a specific photograph is almost useless to the process of rendering a painting alive. However, several reference images from various angles and perspectives, often captured over a few hours of plein air painting, can be a helpful resource once you are back in the studio. I frequently take between 50 and 150 reference images for a specific canvas. Sometimes I even have years of photographic references collected on a specific subject before I decide on a larger landscape canvas. The most significant difference between a photograph and the process of painting from life is that a photograph freezes the light and shadow. It has one still perspective. On the other hand, a painter, working from what is in front of them, paints the light and shadows in motion. This dynamic experience is combined with the actual motion and movement of the painter. A camera cannot see around corners. But a painter can. The painter also has all of the other information available to them from their other senses. In order to replicate this body of rich information in the studio, it must be gathered in the field to provide the sensory memory-triggers for the painter when they no long have the subject directly in front of them. The human eye darts around continuously recording patches of colour. The brain organizes this information by relevance and in relationship to each other, allowing us to quickly discern objects. This organizing is influenced by more than information provided by the eyes. It is accomplished by referencing information from all of our senses and by past experiences. We have, over our life-time of observation, created a refined system of “seeing” that has built-in short-cuts. In the painting-from-life and alla prima process, we want to unpack this refined system of observation and conclusions that our brain has developed. We attempt to bring our awareness back to as much of the raw data being input into the brain as we possibly can. The single camera image used as a painting reference interferes with this raw data retrieval process and, by extension, will interfere with the painting. However, a collection of images will more easily allow the painter to access what the eye, the ears, the nose, and the physical body observed – before the brain began to organize and make sense of this information. A painter almost always wants access to the cumulative raw data from all of their senses when painting from life – before they attempt to draw any conclusions with a brush on a canvas. This is how mystery, intrigue and also familiarity is rendered onto a canvas. As a painter, you are inviting the viewer to organize the raw information you have discovered and skillfully arranged onto the canvas for themselves. Through this painting kind of invitation, you have the best chance of being able to engage the full-body sensory receptors of the viewer when they look at your work. They then use their own life-time practice of “seeing” and organize the information you have provided for themselves. In this manner the painting conversation will continue with each individual viewer – endlessly. That is the possibility, the promise and the hope anyway.
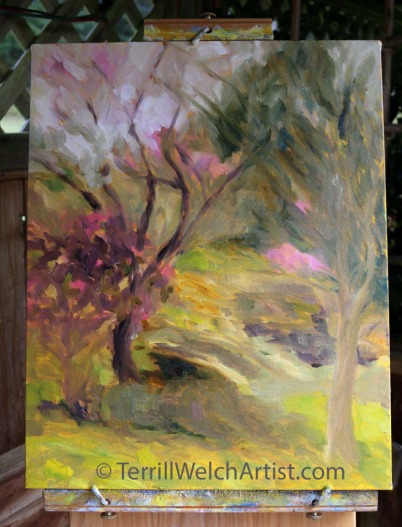
7. The closer to the actual life-experience one works in the studio, particularly in the beginning when learning to paint, the easier it is to access the first impressions of a subject within its context. So, when I return to the studio, I immediately continue working on my painting. By now, it is evident that the plum blossoms are my star and everything else is my supporting actors. To fulfill my intention of capturing the first breath of spring, all high, low and minor notes in the painting must come together in a full inhale and exhale towards this single purpose. The boldest of the bold must be visible on the canvas. The darkest dark and the lightest lights begin to fall into in place. The shimmering curves of colour must be placed and exaggerated just slightly for emphasis. We are now ready to add a simplistic garment over the bones, tendons of our composition.
8. I pause. I stand way back and revisit my composition. Some elements have shifted from their actual placement. Do they work better or worse than what I observed in my initial inspiration? At this point the painting must stand on its own. It must be able to breathe on its own. The painting must begin the process of separation from the actual subject and even from the painter’s own experience. Now, what is on the canvas and the painter’s intention must work together to bring the work to completion. I decide to take bit longer break before venturing into the final stages of completing the painting. A cup of tea. A twitter tweet. A Facebook post. A trip to the bathroom and a walk out on the deck. I glance at that painting from different angles out of the corner of my eye. I do whatever it takes to separate my ego-self from the painting and to allow me to join in an equal partnership with what is on the canvas. Do I want to continue the painting conversation? Is it a dynamic, meaningful and inspiring possibility? It is okay to if it is not, for then I ask myself and the canvas if it is a salvageable relationship. If it is not, then there is no need to go any further. The canvas can be scraped, the painting outlines with its rough paragraphs can be deleted. Or the bones of the work can be left to ponder or reorganize into another attempt. Whatever metaphors a painter wants to use, this is the point where I decide if I am fully invested in completing the work or if it was only a passing thought. The intention I set, before I ever pick up a brush or squeezed a tube of paint, is my best touch-stone in helping me to make this decision. Take yourself back to that loosely held aim for your canvas. In this way you can look at the canvas with fresh eyes. Now, make a decision one way or the other and move forward.
I decide to complete the painting. At this point I can start working with my medium and smaller brushes.
*Tip – to choose the best-size brush for the job of creating the painting impressions of your subject, pick up the largest one you think you can manage. Then put it down and choose one that is just slightly larger than that.
By the end of the day, I can feel the essence of early spring on the canvas. I am close to complete.
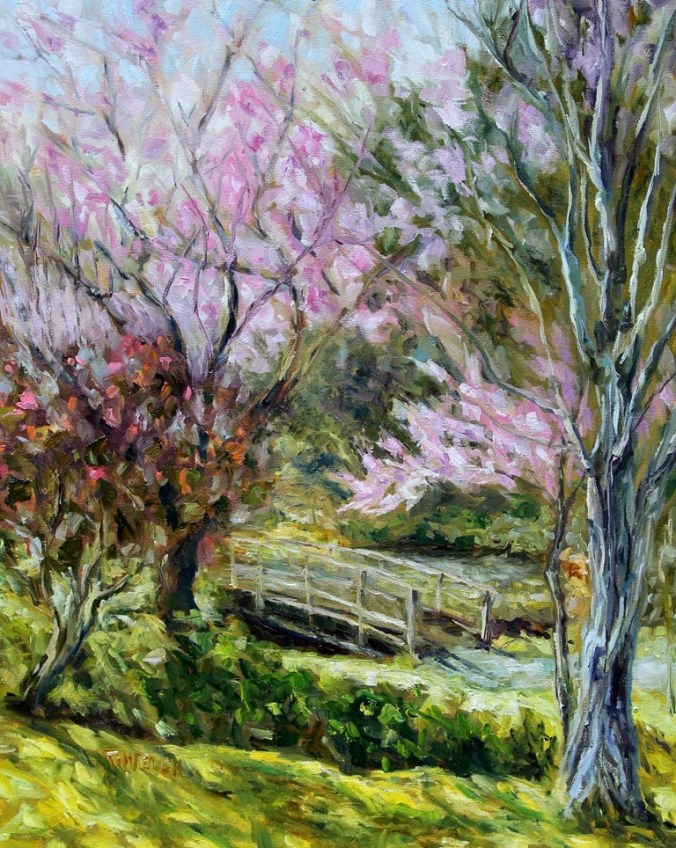
The next morning I refine the painting’s garments for a slightly better fit with a tuck here and a bracelet there, maybe a bolder pair of earrings for a bit of sparkle and I move the buckle of her plum-blossom belt right into the sunlight. The painting is done. Allow me to introduce you to:
Plum Blossoms Japanese Garden 20 x 16 inch oil on canvas by Terrill Welch
You now have all the basic building blocks to paint your first oil painting using an alla prima oil painting method but one. Can you guess what it is?
9. To conclude your painting process, review your palette for clues to what you have learned, what you want to remember for next time and what worked and didn’t work. Ask yourself what you want to start doing, stop doing and keep doing for your next painting. No two paintings that use the method I have set out before you will look the same. Each painter brings their own experiences, temperament and attitude to the process. We each have our own painting fingerprint. Part of understanding these individual characteristics is to review your palette at the end of a painting process. To assist me in this process, I like to start with a clean palette at the beginning of each painting – because I love light and colour and the simple abundance that can be found in an ordinary day. This is part of my own personal finger print. A clean palette at the start of each painting gives me the best chance of mixing what I see before me rather than what I saw previously.
Now you are ready to practice, practice and practice some more. As you come across new painting problems there will be new methods, approaches, techniques, painting theories and ideas to learn in order to find a solution. This process never ends. But you have enough information here to get you started. You have enough to allow your painting practice to serve your intentions. Of course, this is not the “right” way or the “only” way to approach oil painting. It is one way. As your body of knowledge and experience grows, you will refine and add to your own individual painting practice. The purpose of this post is to allow you to get started.
For my regular readers, this may seem like a gathering of the highlights from several years-worth of posts about my painting process that has been shared in this Creative Potager blog. Of course, it isn’t everything. Just a beginning. But it is a beginning that gives the reader some of the basics for a life-long practice of bringing the brush to paint and then to the canvas when using a wet-on-wet or alla prima method.
For new and regular readers, that want to learn how to oil paint, I hope you have found these nine steps helpful. If you would like to work together further, I am offering online feedback (for a fee) on your specific painting efforts via my personal Facebook profile or email at tawelch@shaw.ca You may private message me if this is something that interests you. In order to prioritize my own studio time, I only have the capacity for a small number of participating painters at a time. However, please feel free to check in with me and we can see what might work. In the meantime, happy painting!
What intention are you setting for today?
© 2016 Terrill Welch, All rights reserved.
Liberal usage granted with written permission. See “About” for details.
Creative Potager – Visit with painter and photographer Terrill Welch
From Mayne Island, British Columbia, Canada
For gallery and purchase information about Terrill’s photographs and paintings go to http://terrillwelchartist.com
